Effective Ways to Get a Splinter Out Quickly in 2025: Ready-to-Use Techniques
Getting a splinter can be quite an annoying experience, but knowing **how to get a splinter out** efficiently can save you a lot of pain and discomfort. Whether you’ve encountered a deep wooden shard or something sharp from glass, the following techniques will help you remove it safely and quickly. Here you will learn various **splinter removal techniques**, tools required, and tips on how to treat splinters to prevent complications.
Understanding Splinters and Their Impact
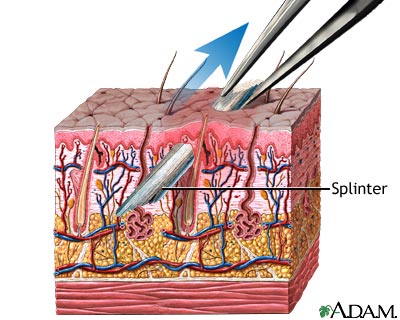
Splinters are tiny fragments of wood, glass, or metal that become lodged in the skin. It’s important to recognize that although a splinter seems minor, it can lead to serious issues if left untreated. Knowing how to recognize splinter symptoms is crucial for early intervention. Common symptoms include redness, swelling, and pain around the site. Ignoring these signs can lead to infections or even the need for a medical rehabilitation.
Common Types of Splinters
There are various types of splinters, each requiring different **splinter removal methods**. Wood splinters are the most common, but they can vary in thickness and depth. Glass splinters generally require more caution due to their sharp edges. Knowing the type of splinter you’re dealing with can influence your removal approach, and the tools you might need, from tweezers to a needle for stubborn cases.
Complications from Untreated Splinters
Leaving a splinter in your skin can lead to severe complications, such as **splinter infections**. These may manifest as increasing redness, persistent pain, and even pus formation. If you notice these signs after removing the splinter, it’s crucial to **disinfect** the area properly and seek medical advice if necessary. This emphasizes the importance of understanding **how to treat splinters** effectively after removal.
Best Tools and Techniques for Removing Splinters
When it comes to splinter removal, having the right tools is essential. Some of the most effective **splinter removal tools** include tweezers, needles, and adhesive tape. Knowing the best techniques to extract a splinter can greatly reduce pain and prevent further irritation. Here are some tried-and-true methods to consider:
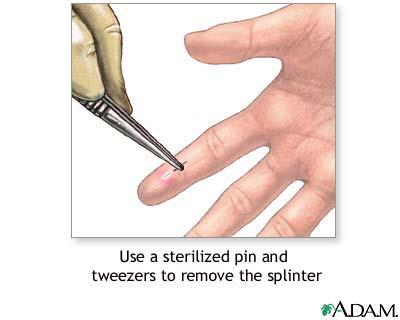
Using Tweezers for Splinters
Tweezers are one of the most straightforward methods for splinter removal. To effectively use this tool, ensure that your tweezers are clean and sterilized. Gently pinch the splinter at one end and pull it out slowly at the same angle it entered. If you can’t grasp the splinter properly, using a needle may be a better option to expose more of it before retrying with the tweezers.
Soaking the Splinter in Water
For embedded splinters or those that are deeply lodged, **soaking the splinter in water** can help soften the skin around it. You can soak the affected area in warm, soapy water for about 15-20 minutes. This method not only aids in removal but also helps to relieve any discomfort associated with it. After soaking, gently pat the area dry and try your extraction methods again.
Applying Adhesive for Splinter Removal
An alternative method for shallow splinters is to apply a piece of adhesive tape over the affected area. Let it sit for a while, then rip it away quickly. The adhesive may grip the splinter tightly enough to pull it out without much effort. It’s a **safe splinter extraction** technique when dealing with smaller splinters.
Natural Remedies for Splinter Removal
If you’re interested in **natural splinter remedies**, there are several home methods you can explore. These remedies are not only effective but also safe for your skin.
Using Heat to Extract Splinters
Applying a warm compress to the affected area can help the splinter work its way to the surface. Heat expands the skin and softens the tissue, allowing easier access once you’re ready to use tweezers or a needle. Additionally, a diluted solution of baking soda and water can be applied to make this **splinter extraction method** even more effective. Use a clean cloth to hold it over the area and enjoy its soothing effects.
Homemade Balms and Oils
Some individuals find that essential oils such as tea tree or lavender oil can help alleviate symptoms and **prevent splinter infections**. These have antiseptic properties that can heal the surrounding skin post-removal, ensuring that it is well taken care of. Always apply these oils with care to avoid allergic reactions, especially on broken skin.
Caring for a Removed Splinter Site
After removing a splinter, it’s crucial to take the proper steps for post-removal care to ensure your skin heals well and reduces potential complications. Here’s how to care for your skin and ensure a speedy recovery:
Disinfecting the Area Post-Removal
Once the splinter is removed, the next step is to **disinfect** the area to prevent any germs from entering. Use a gentle antiseptic to clean the wound effectively. Apply a small amount onto a cotton ball and dab it over the affected area. Follow up by ensuring the area is covered with a clean bandage.
Keeping the Area Clean and Dry
For optimal healing, it’s essential to keep the area clean and dry. Change the dressing regularly and apply a fresh layer of antiseptic cream. Instructive **splinter care tips** include limiting exposure to dirt and moisture—especially until any open area has healed fully.
When to Seek Medical Advice
Knowing **when to see a doctor for a splinter** is equally important, especially if you’re unable to remove a stubborn splinter yourself or if you notice signs of infection. Seek professional medical help if you experience excessive swelling, increased pain, redness, or pus oozing from the area. Persistent issues shouldn’t be ignored as they could progress into deeper issues requiring surgical intervention.
Key Takeaways
- Effectively identifying and removing a splinter prevents complications.
- Utilizing proper tools and methods significantly enhances the splinter extraction process.
- Aftercare is vital for avoiding infections and promoting healing.
- Consult a medical professional when complications arise.
FAQ
1. What to do if a splinter is deeply embedded?
If you find yourself dealing with a deep splinter, consider using a needle to expose a bit more of the splinter before attempting extraction with tweezers. Alternatively, soaking the area may help as well.
2. Can I use vinegar for splinter removal?
Vinegar can help soften the skin around lingering splinters, making it easier to pull them out. It’s considered a kind of **natural disinfectant**.
3. Are there any risks if a splinter is left too long?
Yes, leaving a splinter in can lead to infections that may require medical attention. Symptoms to watch for include redness, heat, and swelling around the area.
4. How can I prevent getting splinters?
Wearing protective gloves while working with wood or in environments where sharp objects are present can serve as effective **splinter prevention tips**.
5. Is there a risk of an allergic reaction to splinter treatments?
Yes, some individuals may have allergic reactions to certain antiseptic creams or natural remedies. Always do a patch test first if you’re using a new product.
6. What are some common places to get splinters?
Common places for splinters include the hands, fingers, and sometimes feet, particularly for those involved in outdoor activities or woodworking.
7. How to alleviate pain from splinters?
Applying a warm compress can significantly reduce pain from a splinter. Over-the-counter pain relief can also be used as directed to help ease discomfort.