“`html
Effective Ways to Lay Pavers: Practical Tips for a Beautiful Pathway in 2025
Creating a beautiful outdoor space starts with understanding how to effectively lay pavers. Whether you’re considering a new paver walkway design or looking to enhance your garden pathways, the techniques you employ in paver installation can significantly influence the final outcome. This guide will delve into essential tips for moving forward with your DIY paver project, ensuring you achieve stunning results that last for years.
Understanding Paver Installation Techniques
The first step to a gorgeous outdoor area is grasping the basics of paver installation. This involves knowing how to select the right materials and developing a solid paver layout plan. The materials you choose will create the foundation for your project, while your layout will dictate the aesthetic outcome. From concrete pavers to decorative options, knowing the best paver materials is crucial for longevity and beauty. Start with choosing weather-resistant and durable pavers vs concrete options that fit your needs.
What Is Paver Base Preparation?
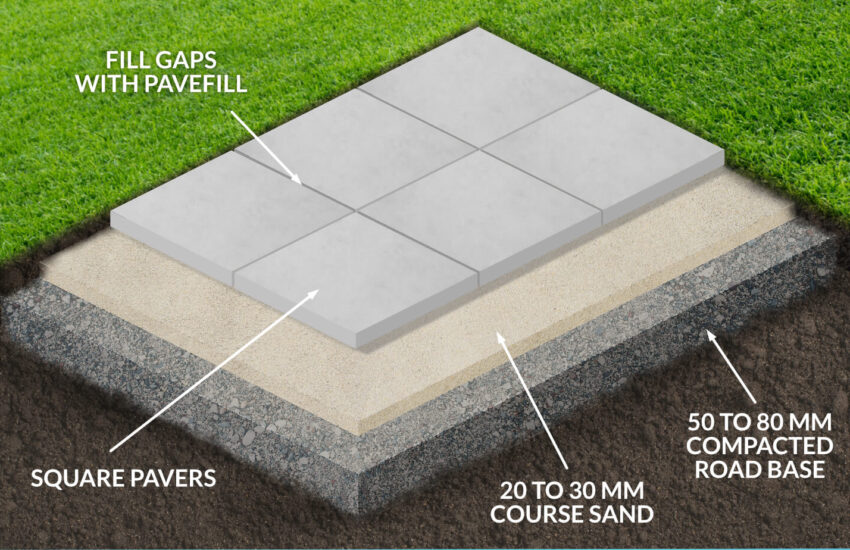
Paver base preparation is fundamental for a stable installation. It includes leveling the ground and providing a solid foundation that will minimize movement over time. Typically, you will need about 6 inches of gravel base for most projects. Begin by excavating the area to an appropriate depth and ensuring the ground is well-compacted. Consider the use of landscape fabric to help control weeds, or install a layer of sand before adding your gravel for enhanced stability. Proper preparation prevents shifting and settling, protecting your investment.
Choosing and Setting Paver Patterns
Another essential aspect of laying pavers is choosing paver patterns. The design can dramatically affect the look of your area. Classic styles include herringbone and basket weave, which adds sophistication to pathways, while a simple running bond gives a more minimalist appearance. Once you’ve decided on your **paver design ideas**, use string lines to map out exact placements. When setting pavers, it’s crucial to keep consistent spacing and ensure they are level to avoid tripping hazards.
Tools and Equipment for Paver Installation
Successful paver installation relies heavily on the right tools and equipment. From cutting tools to safety gear, this section will guide you on essential tools for paver installation. Ensuring you have the right gear will not only make your project easier but also safer.
Essential Tools Needed for Paver Installation
To start, you’ll need basic paver installation equipment such as a rubber mallet for setting pavers, a level to ensure correct height, and a compactor for the base. A high-quality stone saw is crucial if you plan to cut pavers to fit around curves or edges. Additionally, consider investing in paver leveling tools to maintain consistent homeowner-driven quality. Accumulating these tools before starting will help streamline the entire process.
Practical Tips for DIY Paver Projects
Whether you’re a beginner or an experienced DIYer, there are a few paver installation tips that can enhance your effectiveness. Start by plotting out your workspace and having all your materials on hand. Organize a timeline that allows breaks, as the work can be physically demanding. As you install, frequently check the levels—this will avoid issues later on and expedite paver maintenance. Ensure every layer stands up to quality expectations to guarantee long-lasting results. Ask someone to assist if intricate designs are part of your project.
Paver Drainage and Joint Considerations
Effective drainage and maintaining proper joint spacing are vital for prolonging the life of any paver surface finish. Neglecting these aspects leads to moisture accumulation and potential movement of the pavers. Proper drainage prevents water from pooling and causing surface damage over time, making your design visually stunning and functionally reliable.
Understanding Paver Joints
The spacing and filling of your paver joints play a critical role in both the appearance and drainage of your paving project. Keeping between 1/8 and 1/4 inch between pavers will allow for flexibility and settling, while using polymeric sand can prevent weed growth and insect infestation in those spaces. Regular cleaning is also essential; gently pressure wash to keep your paver surface clean.
Addressing Paver Drainage Concerns
Addressing paver drainage is essential for the longevity of your installation. Consider adding slight slopes away from structures for water runoff and incorporating permeable pavers that enhance drainage to reduce soil erosion. Installing drainage systems underneath—not just around—pavers can greatly inhibit water buildup, thus preserving the quality and aesthetic of your paths.
Final Touches: Paver Sealing and Maintenance
Once your pavers have been laid and appropriately configured, *paver sealing* becomes a significant next step. This ensures added protection from the elements, stains, and fading due to UV exposure. Regular paver maintenance is crucial for sustaining vibrancy and structural integrity for years.
Paver Sealing Benefits
Sealing your pavers envelops the surface in a protective layer, minimizing the absorption of spills and stains, while also simplifying cleaning efforts. You may choose between wet-look and matte finishes to customize the look. Before sealing, ensure the surface is clean and debris-free. This simple step enhances your outdoor area’s overall beauty.
Regular Paver Maintenance Practices
Embrace a routine maintenance schedule, inspecting your paver area every few months. Look for signs of wear or stabilization issues and promptly repair any shifting or cracking. Regular paver repair involves refilling joints as needed and ensuring your drainage systems are correctly functioning. This fosters longevity, making your labor worthwhile.
Key Takeaways
- Effective paver installation integrates proper preparation, tool selection, and planned patterns.
- Understanding the importance of paver drainage and joint management can prevent long-term issues.
- Regular sealing and maintenance are critical for sustaining the aesthetic and structural integrity of your pavers.
FAQ
1. What materials are ideal for paver installation?
The best materials for paver installation include concrete, brick, and natural stone pavers. Each material has distinct benefits concerning durability, aesthetics, and cost-effectiveness. When selecting, evaluate the location and purpose of your pathway or patio to ensure optimal choice.
2. How can I prepare my site for laying pavers?
Preparing your site involves excavating to the appropriate depths for base materials, ensuring a leveled surface, and installing drainage if needed. Use landscape fabric, effectively controlling weeds and maintaining stability.
3. What are some common paver installation mistakes?
Common mistakes include insufficiently compacting the base, overlooking drainage requirements, and mismatching paver patterns. Planning and reviewing your process frequently can help prevent these issues from arising.
4. How long do pavers typically last?
With proper maintenance, high-quality pavers can last upwards of 20 to 30 years. Regularly sealing and inspecting your installation can enhance longevity significantly.
5. Can I lay pavers over existing concrete?
Yes, you can lay pavers over concrete, but you’ll need to ensure the existing surface is stable with no significant cracks or damage. Adding a layer of sand under the pavers for spacing is recommended.
6. What maintenance is needed for pavers?
Maintenance for pavers involves regular cleaning to prevent stains, releveling any uneven sections, and monitoring joint fillers. Proper care contributes to their increased lifespan and maintains aesthetic appeal.
7. What are the steps in the paver installation process?
The paver installation process includes site assessment, excavation, base preparation, laying pavers according to chosen patterns, compacting, and finishing with joint fillers. Each step ensures a solid and visually appealing outcome.
“`