Effective Ways to Indent in Word for Better Document Formatting in 2025
Learning how to indent in Word can significantly improve the readability and organization of your documents. Indentation helps to clearly separate paragraphs, emphasize bulleted lists, and create a well-structured layout. In this article, we will explore various techniques and settings for adjusting indent in Word, customizing your indentation preferences, and using practical shortcuts for efficient formatting. Whether you’re a student, professional, or simply someone who wants to create visually appealing documents, understanding indentation in Word is an essential skill.
Understanding the Basics of Indentation in Word
Before diving into specific indent settings in Word, it’s important to grasp the fundamental concepts of indentation. In Microsoft Word, indentation refers to the space between the text and the left or right margin. By default, Word provides several indents, which include left indent, right indent, first line indent, and hanging indent. Understanding these basic types will allow you to better manipulate your document’s paragraph formatting in Word.
Types of Indentation
There are several types of indentation settings you can use based on your document needs: the left indent in Word shifts the entire paragraph inwards from the left margin, while the right indent in Word does the same from the right margin. The first line indent in Word allows the first line of each paragraph to be indented while keeping the rest flush left. On the other hand, a hanging indent in Word is useful for referencing styles, where the first line remains aligned, but all subsequent lines are indented.
Using Indentation for Bulleted and Numbered Lists
Indenting bullets and numbered lists correctly is crucial for maintaining a clean layout in your document. The bullet indent in Word adjusts the space between bullet points and the body text for improved visibility. To achieve this, navigate to the “Paragraph” settings and modify the indent for lists accordingly. This helps in organizing points effectively and making lists visually clearer to your readers.
Accessing Indentation Settings
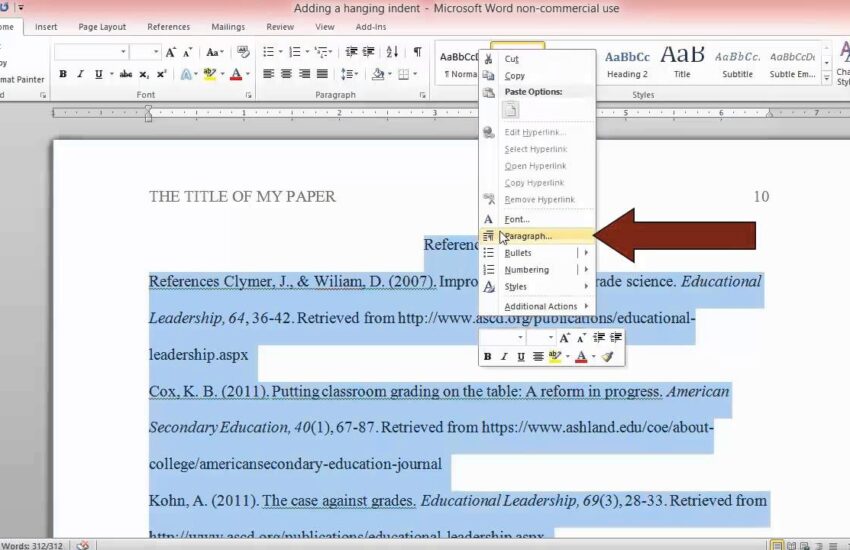
You can access the indentation options in Word through the paragraph settings box. To do this, select the text you wish to format, right-click, and choose “Paragraph.” From there, you will see options to adjust all types of indents. Customizing these settings allows you to apply customized paragraph indents, enhancing your document’s layout significantly. This flexibility is especially useful when you are adhering to specific formatting guidelines for professional papers or publications.
Steps to Set Indentation in Word
Setting proper indentation in your Word document can help ensure all your content looks neat and is easily readable. Here are steps you can follow to set indentation in Word effectively.
Adjusting Margins for Better Indentation
Before applying indents, make sure to check your page margins as they can affect how your indent settings perform. Navigate to the “Layout” tab, and adjust margins as needed to suit your document’s objectives. After ensuring the margins are optimal, proceed to use Word’s built-in indent features. Proper setup of the overall document layout improves the document organization in Word.
Utilizing the Ruler for Easy Indentation Adjustments
The ruler in Word provides a straightforward way to visualize and adjust indents. To unlock the ruler, simply go to the “View” tab and check the “Ruler” option. By dragging the indent markers on the ruler, you can implement left and right indents quickly. This method also allows you to create specific indentation guidelines for each paragraph or section within your document, promoting consistency and clarity.
Keyboard Shortcuts for Quick Indenting
Efficiency is key when working in Word, and using keyboard shortcuts can save a lot of time. For instance, pressing the Tab key will apply a default first line indent, while Shift + Tab will remove it. Understanding these indentation shortcuts in Word can significantly speed up your formatting process, allowing you to focus on the content instead of the design.
Advanced Indentation Techniques for Better Formatting
Once you are familiar with the basic settings of indentation in Word, you can explore advanced techniques to enhance your documents further.
Creating Complex Indents with Styles
Using styles in Word can lower the amount of time spent on manual formatting and ensure consistent paragraph formatting options in Word. By defining a style that includes specific indent settings for various types of text (e.g., quotes, citations), you can apply the same settings uniformly throughout your document. This is particularly beneficial for larger documents where consistency between sections is critical.
Fixing Common Indentation Issues
Indentation issues may arise, such as mismatched indents in paragraphs or improperly formatted bullet points. To resolve these issues, revisit the paragraph settings, adjust the space before or after paragraphs, and ensure each bullet list adheres to the same indentations. Using the indentation adjustments in Word wisely can help to maintain the overall professionalism of your document.
Improving Document Readability with Proper Indentation
Proper indentation not only organizes your text but also enhances readability. When audiences can quickly identify where paragraphs begin and end due to clear indents, they are more likely to engage with the content. In professional settings, this aspect is vital for delivering information effectively. Always consider using visible spacing and indentation techniques to create an inviting reading experience.
Key Takeaways
- Understanding the various types of indentation is fundamental for effective document formatting in Word.
- Utilizing the Ruler and keyboard shortcuts can greatly streamline your document editing process.
- Creating styles promotes consistency in indentation and overall paragraph formatting.
- Always verify and troubleshoot indentation settings to maintain document professionalism.
- Enhancing readability through proper indentation is key to engaging the audience effectively.
FAQ
1. How can I create a hanging indent for my references?
To create a hanging indent in Word, select the paragraph you want to adjust, then go to the “Paragraph” settings. Under “Indentation,” select “Hanging” from the Special dropdown menu. This will shift all lines after the first line of your paragraph to the right, perfect for formatting citations or long references.
2. What is the fastest way to indent paragraphs in Word?
The quickest way to indent a paragraph in Word is by using the Tab key, which will apply a default first line indent. For a hanging indent, you’ll need to adjust it via the “Paragraph” settings or manipulate the ruler. Using these methods ensures efficient formatting of your documents.
3. Can I customize default indentations for new documents?
Yes, you can set default indentations in Word for your future documents. Go to the “Paragraph” settings, adjust your indentations as needed, then click on “Set as Default.” This will ensure every new document opens with your preferred indentation settings.
4. Why is my indentation not appearing correctly in Word?
Incorrect indentation can happen if non-standard styles or formatting are applied or if spacing before or after paragraphs is set incorrectly. Ensure that the document settings align with your indentation preferences, and check styles used to confirm consistency.
5. How do I indent a list properly in Word?
To indent a list, select the list, then adjust the indents in the “Paragraph” settings or by using the ruler for a more visual approach. You can also set different indentation levels for nested bullet points by pressing the Tab key for indented levels or Shift + Tab to outdent.